
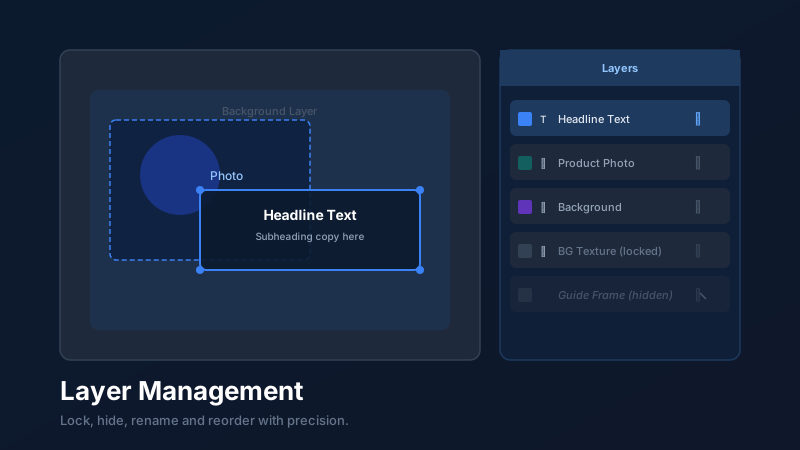
Why Layers Are the Hidden Backbone of Good Design
Layer management in a design tool is the system that controls the stacking order, visibility, editability, and grouping of every object on a canvas. CollabDraw provides a full layers panel with lock, hide, rename, reorder, and group controls — letting you manage complex multi-element designs with the same precision as professional design software, entirely free and in your browser.
Beginners ignore the layer panel. Intermediate designers visit it occasionally. Expert designers rely on it constantly. The difference in productivity and design quality is dramatic.
This guide covers everything you need to know about the CollabDraw layers panel — from basic reordering to advanced locking strategies that keep complex multi-element canvases navigable.
Opening the Layers Panel
The layers panel is accessible from the left toolbar. Click the Layers icon (it looks like a stack of rectangles) to open a panel listing every object on the current canvas page.
Each object appears as a row showing:
- A small thumbnail or shape preview
- The object's name (default is the object type — "Rectangle", "Text", "Image" — but you can rename any of them)
- Visibility toggle (the eye icon)
- Lock toggle (the padlock icon)
The order of rows reflects the stacking order on the canvas: the topmost row is the frontmost object.
Renaming Layers: The First Habit to Build
The single most impactful thing you can do for a complex canvas is rename your layers. Default names like "Rectangle 12" and "Image 7" tell you nothing. "Hero Background", "Product Photo", "CTA Button Text" tell you exactly what each layer is and where it sits in your design.
To rename a layer: double-click the name in the layers panel and type the new label. Hit Enter to confirm.
Good naming conventions to adopt:
- Use a prefix to categorise: "BG — Main Background", "TEXT — Headline", "IMG — Hero Photo"
- Use descriptive, not generic names: "Nav Bar" rather than "Rectangle"
- Number sequenced elements: "Step 1 — Onboarding", "Step 2 — Profile Setup"
Well-named layers pay dividends every time you come back to a project — whether that's an hour later or six months later.
Locking Layers: Protecting What You've Finished
Locking a layer prevents it from being accidentally selected, moved, or edited. This is essential for background layers, guide elements, and anything you've finished and don't want to disturb while working on other parts of the design.
Common layers to lock:
- Background fills and gradients — once placed, they rarely need to move
- Grid or guide frames — structural guides that define your layout but shouldn't be edited
- Imported document pages — when you're annotating a PDF, lock the underlying page so you only interact with the annotations
- Brand elements — logos, colour swatches, and style reference elements that form the foundation of the design
To lock a layer: click the padlock icon in its row in the layers panel. A locked layer shows a filled padlock icon. You can still see it and reference it — you just can't accidentally click it on the canvas.
Hiding Layers: Reducing Visual Complexity
Hiding a layer makes it invisible on the canvas without deleting it. This is powerful for several situations:
Working on one section at a time
Hide all layers except the section you're currently editing. This dramatically reduces visual noise and makes it easier to focus on the area you're working on without accidentally selecting the wrong object.
A/B comparison
Create two versions of a design element on separate layers. Show one, hide the other — toggle between them to compare without any risk of accidentally mixing elements from both versions.
Presenting clean versions
Hide guide frames, annotation sticky notes, and work-in-progress elements before sharing a link. Your collaborators see the clean design; you keep the working notes visible only for yourself.
Reordering Layers: Controlling What's On Top
The stacking order determines which objects appear in front of others when they overlap. You can change an object's position in the stack in two ways:
- Drag in the layers panel — drag any row up or down to move it above or below other layers
- Right-click on the canvas — use the Bring Forward, Send Backward, Bring to Front, and Send to Back options in the context menu
- Keyboard shortcut — use Cmd/Ctrl + ] to bring forward and Cmd/Ctrl + [ to send backward one step at a time
Grouping: Managing Multiple Layers as One
When a design component consists of multiple elements — say, a card with a background, an image, a title, and a button — grouping them turns the whole card into a single selectable unit.
To group: select multiple objects and press Cmd/Ctrl + G. The group appears as a single row in the layers panel, which you can expand to access individual elements within it.
Groups are the key to working with template-based layouts. Duplicate a group to create a second card, second step, or second slide that maintains the same internal structure — then edit each group's content independently.
How CollabDraw Compares to Figma, Adobe XD, and Sketch for Layer Management
When choosing a free design tool with layer management, the main alternatives are Figma (freemium with limited free projects), Adobe XD (paid Creative Cloud subscription), and Sketch (macOS-only, paid license). Here's how CollabDraw stands out:
- Truly free: Full layer panel with lock, hide, rename, reorder, and group — no paid plan required
- No sign-up required: Start designing instantly — Figma, Adobe XD, and Sketch all require account creation or software purchase
- Browser-based: Works on any OS — Sketch is macOS-only, Adobe XD requires installation
- Unlimited projects: No project count limits on the free tier — Figma caps free projects
Key Facts About CollabDraw's Free Layer Management
- Price: 100% free — no subscription, no credit card, no watermark
- Layer controls: Lock, hide, rename, reorder, group, and ungroup
- Keyboard shortcuts: Full layer shortcuts including bring forward, send backward, bring to front, send to back
- Export formats: PNG, PDF, SVG, PPTX — all free
- Account required: No — start without signing up
- Best for: Designers managing complex multi-element canvases, presentations, and infographics
Practical Layer Workflow for Complex Projects
For presentations, infographics, and multi-section designs, a clear layer structure makes the difference between a project that's a pleasure to work on and one that becomes progressively harder to manage. Establish your layer naming convention early, lock finished sections as you go, and group related elements as soon as they're placed. Your future self will thank you.