Three Image Tools That Transform Your Design Workflow
Working with images in a design tool used to mean a constant back-and-forth between your design application and a photo editor. Crop in Photoshop, apply a filter in Lightroom, save, import, position, realise the crop isn't quite right, repeat.
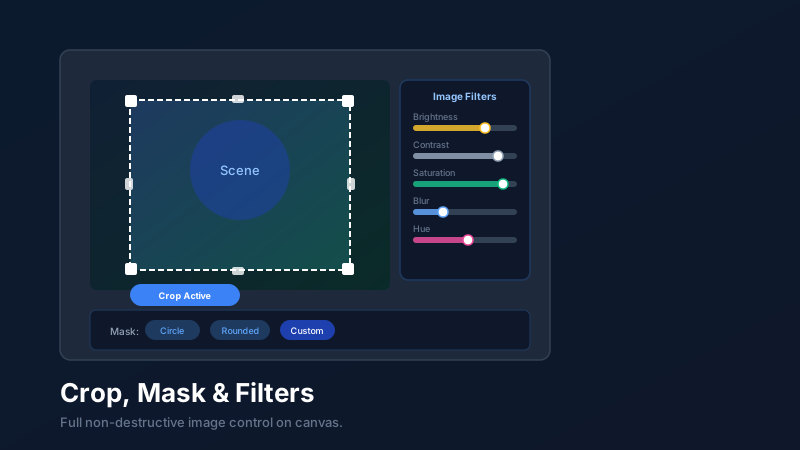
CollabDraw's built-in image tools eliminate this workflow entirely. Crop, mask, and filter controls are available directly on every image placed on your canvas — non-destructive, reversible, and immediately visible as you work.
The Crop Tool: Perfect Composition Without Permanent Changes
Cropping in CollabDraw is non-destructive. This means that when you crop an image, the hidden areas aren't deleted — they're just concealed. You can adjust or reverse the crop at any time without losing any part of the original.
How to crop an image
- Select an image on the canvas
- Click the Crop button in the image toolbar (or double-click the image)
- Drag the handles on any edge or corner to define the visible area
- The dark overlay shows the cropped-out area that will be hidden
- Click outside the image or press Escape to confirm the crop
Repositioning inside the crop frame
While in crop mode, you can also drag the image itself inside the crop frame — useful for repositioning the subject within the chosen composition without resizing the overall image placeholder. This is exactly how you'd pan an image inside a frame in Sketch or Figma.
Crop aspect ratios
For social media content, common aspect ratio constraints apply — 1:1 for Instagram posts, 16:9 for YouTube thumbnails, 9:16 for Stories. Hold Shift while dragging crop handles to constrain to the existing aspect ratio, ensuring your content always fits the intended format.
Masks: Shaping Images Into Any Form
A mask defines the visible area of an image using a shape as a clipping boundary. The image is only visible inside the mask shape — everything outside is hidden.
This is how circular profile pictures, hexagonal photo grids, and custom-shaped image callouts are created in professional design work.
Applying a mask in CollabDraw
- Create the shape you want to use as a mask — a circle, rounded rectangle, star, or any custom path
- Position the shape over the image you want to mask
- Select both the shape and the image together
- Right-click and choose "Apply Mask" from the context menu
- The image is now clipped to the shape boundary
Editing after masking
The mask is non-destructive. You can re-enter the masked group to reposition the image inside the mask, swap the image for a different one, or change the mask shape entirely. Nothing is permanently cropped or altered.
Creative applications for masks
- Circle crops for team profile photos in presentations
- Custom polygon shapes for editorial photo callouts in infographics
- Text-shaped masks where an image fills the letterforms of large headline text
- Rounded rectangles for card components with photo thumbnails
- Organic freehand shapes for artistic editorial layouts
Image Filters: Enhancing and Stylising Photos
Every image on the CollabDraw canvas has a set of non-destructive filter controls. These adjustments change how the image looks without altering the underlying file:
Brightness
Increase to lift shadows and make a dark image more usable. Decrease to add moodiness to an overexposed shot or create a dramatic dark overlay for text-heavy compositions.
Contrast
Higher contrast makes colours and tones more distinct — useful for images that look flat or washed out. Lower contrast creates a faded, film-like quality that works well for muted aesthetic styles.
Saturation
Boost saturation for vibrant, punchy visuals appropriate for marketing content. Reduce to desaturate — a subtle desaturation (around 80%) creates a consistent, editorial look across varied images. Full desaturation (0%) produces black and white.
Blur
Apply a small amount of blur to create a depth-of-field effect on background images. A heavily blurred image makes an excellent content background where the texture of the image is desired but the specific content should be ambiguous.
Hue
Shift the hue to change the overall colour temperature of an image. A subtle hue shift can warm or cool an image to match your brand palette — or create stylised colour treatment without touching individual colours.
Combining All Three: A Practical Example
Here's how crop, mask, and filters work together to produce a polished marketing card component:
- Start with a landscape stock photo from CollabDraw's built-in library
- Crop the image to a 4:3 ratio, repositioning to place the focal point in the upper third
- Apply a rounded-rectangle mask to soften the corners and create a modern card feel
- Reduce brightness by 15% and increase contrast by 10% for a richer, more premium look
- Add a subtle desaturation (90%) to neutralise any overly vivid colours that might compete with brand colours
- Place the styled image inside a card frame with a headline and CTA button layered on top
The entire process takes under three minutes. No Photoshop, no Lightroom, no file exports. Everything happens on the canvas, in real time, entirely reversibly.